Pre-Production


Concept Art
Character designs of the characters featured in my final major project.
Early concept art of one of the opening scenes in my final major project.

Concept art of one of the scenes.

Concept art

Storyboard Drafts


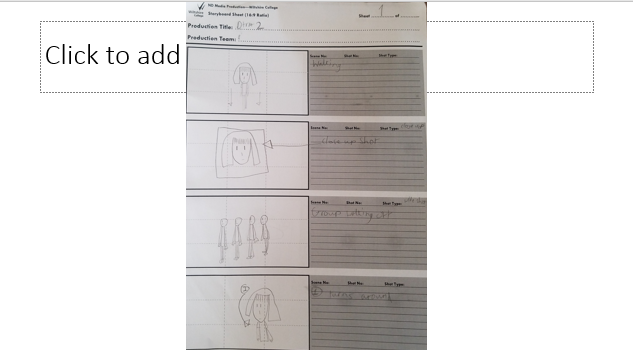


Story line


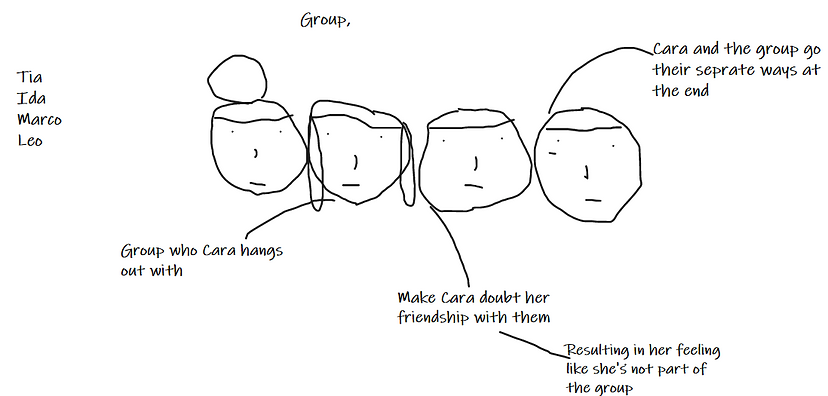
Character Breakdowns


I then updated the character breakdowns.

Draft videos
I created some practice videos using the storyboard for the scenes.
I found from the first practice video I created I needed to change the frame rate to twenty-four FPS (frames per second) on the app I used (Stop-motion studio pro) you can select the frame rate you want on the app, I found that I used five FPS, which resulted in the video being rather slow.
I used felt instead of paper for this practice video it can also be viewed on Context and research. I found that using felt was rather fiddly and had to stick together with glu dots.
From both of these two practice videos I need to change the background, For filming my final major project I will use fabric to cover the wooden background
Screenplay


First Draft of the script


Second draft of script


Third draft of script
Script Feedback
I sent the third draft of my screenplay to the peers in my course for feedback.


The feedback I received was mainly formatting the screenplay, for instance how to present the scene heading, writing the action such as instead of saying we see Cara looking uncomfortable instead say Cara looks uncomfortable, from one of the peers. The other peer commented on showing the emotions that Cara goes through rather than telling them such as what her expression is like?
One of the peers found the story rather relatable to many young people who have the feeling of not fitting in and believed that the story had a good message and was looking forward to seeing my final piece.
I found that the feedback I received incredibly helpful in advancing my screenplay for my final piece.
I then edited the screenplay from the feedback I received


Practice Draft
Practice draft, I used the footage from each of practice videos to make a draft of the short film, with added soundtrack.
Pre-Production Paperwork


Production schedule and location recce (information has been marked out due to privacy reasons)
Reflection
I have so far completed my storyboard and script and started filming one of extreme close-up shots
Though having to retake the scene I filmed, I learned to prioritize the rest of the scenes I need to film. On the other hand creating the storyboard and organizing where the scenes go has been successful.
My plan for next week is to start production stage by filming most of the scenes, though beforehand I may do extra practices with the paper models.
Background work
For my final major project I needed some backgrounds for my stop-motion paper short film , for instance locations featured in my short film included a canteen and common room.


Photos
For the backgrounds featured in my final major project I am vectoring them, beforehand I used the photos I took previously to experiment at first
Prior to finalizing the backgrounds I decided to experiment with different filters, to see which filter would be suitable for the background featured in my final major project.


Final result


I found that changing the photo filter to art I really liked to use the art filter for all of my backgrounds in my short film.

Final result

Filtered backgrounds using the art filter. Experimenting with the art filter in vectorizer io, successful, as I found the art filter was able to capture an animated effect on the backgrounds.
Production
Production and filming schedule


Production (top) and filming (bottom) schedules often subject to change from production difficulties.
Behind the scenes

Setting up the set to film a scene. Which included applying glu dots onto the background and the paper model's hair in order for them to stay stable when filming.
After setting up the scene I then prepare to film, I use a gadget to help take pictures, I find this gadget useful as I don’t have to press the phone in case the phone and tripod lose its position on the set.
As the gadget requires Bluetooth, before filming I then apply Bluetooth onto my phone in order to connect the gadget with my phone. When connected I go onto stopmotionstudio app and first test out the gadget to see if it has connected with my phone before I start filming.
After connecting the gadget with my phone, I then start filming the scene. I did have to retake the scene a few times.
Drawing and tracing models
_j.jpg)
To trace a drawing I took a photo of a previous drawing of one of the paper models and then cropped the image and shared it to my email address, downloaded the image and placed on a word document.


Making face expressions


I would draw the mouth expressions and trace the drawing onto the tracing paper then transfer that drawing onto the card. Before filming the scene I would number each of the mouth expression drawing so it would be easier to place and I would be able to remember which drawing is next.
Silhouette
For one of my scenes in my final major project required the paper models walking for this I found a silhouette image of a person walking so I could use the silhouette image as a template for all of the paper models.
.png)
Silhouette image I selected.

I downloaded the image and placed two of the images on a word document to print out (left image)
Though I had to print out the document a few times as the images were to big for my paper models.

After shrinking the silhouette image I decided to only use the legs of the silhouette to print as I needed to draw and trace the leg part onto each of the paper models.
I used the silhouette print for the paper models when walking.
Production problems
Throughout the production stage of my final major project I experienced many difficulties, particularly with the equipment I was using to film, for instance I was aiming to film a close-up shot for one of my scenes, I found that using the tripod I was using was often seen in the shot. At first I used a phone gripper but found it its arm wouldn't coprate well with my scene as it was hard to twist its arm with how I wanted to shoot my close-up scene. Though I was able to resolve the problem by filming the scene then edit in post-production to size the footage. In addition to using a different tripod I burrowed from my lecturer.


Another issue I had was showing the paper-model's expression, I received help form my father, who made puppet expressions that I was able to change their expressions by pulling the paper up and down.

.jpg)
Also for keeping the paper models in place when shooting my project, at first I used glu-dots but found when after applying them to the paper models they often ripped up the paper models and the background. Fortunately I was able to use blu-tack and more easier to use than glu-dots, as it was easy to break apart, however unlike glu-dots I had to be careful when placing when the blu-tack on the paper-models this is because they are visible unlike glu-dots.


Post-production
Editing


Selecting the footage on the timeline and dragging it further up the timeline.

Going through the footage on the timeline.
Bibliography

Adjusting the size of the title cards

Music filter

After selecting the soundtrack from the audio filter I place the soundtrack onto the start of the timeline.
Music filter

Opened up the effect control filter on Premier Pro, in order to start zooming on the footage displayed on the right screen.

Using the scale tool from effect controls, in order to zoom in on the footage.
Preparing to cut unnecessary footage I don't require.

Moving the footage on the timeline.

Preparing to place footage on the media browser and place onto the timeline.
Opened up the effect control filter on Premier Pro, in order to start zooming on the footage displayed on the right screen.
Drafts
First draft I put all the footage I filmed in production without any soundtrack.
Second draft
Third draft with added soundtrack
Bibliography
Miyamoto, K., 2017. How to Write and Format a Musical Feature Screenplay - ScreenCraft. [online] ScreenCraft. Available at: <https://screencraft.org/2017/11/15/how-to-write-and-format-a-musical-feature-screenplay/> [Accessed 10 April 2021].
Rich, W., 2021. Facial Expression List for Writers. [online] Screenplayhowto.com. Available at: <https://screenplayhowto.com/screenplay-blog/facial-expression-list-for-writers/> [Accessed 11 and 23 April 2021].
2021 [online] Available at: <https://www.dreamstime.com/royalty-free-stock-photography-empty-canteen-image6284647> [Accessed 28 April 2021].
https://www.geograph.org.uk/photo/1020213 28th April
Getty Images. 2021. Gunma, Japan. [online] Available at: <https://www.gettyimages.co.uk/detail/photo/japanese-elementary-school-corridor-royalty-free-image/74858899> [Accessed 26th April and 10 May 2021].
Spaceist.co.uk. 2021. Recent project Oxford High School | grey sixth form room furniture. [online] Available at: <https://www.spaceist.co.uk/oxford-high-school-modular-cubes-detail> [Accessed 9 and 10 May 2021].
Mercedesofsalem.com. 2021. 2018 Mercedes-Benz C 300 4MATIC®* Sedan Specs & Features. [online] Available at: <https://www.mercedesofsalem.com/blog//2018-mercedes-benz-c-300-4matic-sedan-specs-features/> [Accessed 9 and 10 May 2021].
Wheelzine. 2021. Car Window Replacement Cost. [online] Available at: <https://wheelzine.com/car-window-replacement-cost> [Accessed 9 and 10 May 2021].
https://www.dreamstime.com/royalty-free-stock-photography-empty-canteen-image6284647 (assessed 28 April 2021)
Pinterest. 2021. Walking man side view silhouette #AD , #man, #Walking, #view, #silhouette, #side in 2021 | Silhouette man, Walking man, Silhouette images. [online] Available at: <https://www.pinterest.com/pin/642044490627448456/> [Accessed 10 and 20 May 2021].